
Further your craft in wildlife photography by utilizing these ten wildlife photography tips in the field
[Updated April 2020]
This post contains affiliate links for which Expedition Wildlife may receive a commission (where applicable) at no additional cost to you.
Learning photography is fun, challenging, and time-consuming, and our wildlife photography tips can help you further your craft!
Photographing wildlife adds complexity to photography basics because wild animals, and nature in general, are inherently unpredictable.
Here are our ten Wildlife Photography tips to keep in your pocket!
1) Know your gear and how to use it
Everyone has heard “practice, practice, practice” at some point in their life, whether by a parent, teacher, or that nagging voice inside our head.
Photography is no different. In the fluid movements and quick moments required to take that epic shot, you need to know your gear and you’ll want to be prepared.
Every camera is ergonomically different; even model changes in a camera might mean buttons are placed in different locations.
First, know where everything is on your camera and how to change it.
This might seem straightforward, but in the heat of the moment, when an animal moves quickly out of the light into some shade, or when an animal takes off into flight, you’ll need to quickly adjust your settings to match the environment.
This is where that practice component comes in. As you add to your experiences by honing your skills, your hand movements will become second nature. Your brain will more automatically register the changes in the environment and subject.
Some general rules of thumb for photography include:
1) Your minimum shutter speed should be no less than the focal length of your lens.
2) When shooting in lower light, you’ll generally want to use a lens with a larger aperture (lower F-stop number).
3) For faster-moving animals, use around 1/125 second shutter speed and high ISO.
4) If there is a lot going on in your background, choose a larger aperture, such as f/2-f/5.6 to decrease your depth of field and only keep the animal in focus.
5) Focus on the eyes of your subject, even if the rest of the image is blurred (this doesn’t mean you need eye contact from the subject, however).
6) Utilize the “rule of thirds” in your photos. Experts on the subject have found that the human eye finds images balanced into thirds more visually pleasing. Some have argued that the “golden ratio” is a better composition technique. Either way, try putting your photographic subject off-center to see how you like the composition compared to fully centered.
While these aren’t hard and fast rules, they’re good places to start. Continue playing around with the settings in each of your photographic scenarios to see what works and what doesn’t.
One of our favorite wildlife photography tips…
Use back-button focus to make your camera movements more fluid, and your shots crisper.
Back-button focus, simply, allows you to switch the focus button to one on the back of your camera.
Most cameras are pre-set to have the shutter button act as a focus. Shifting to back-button focus allows your shutter button to do what it does best – taking photos.
This adjustment allows you to use your index finger to utilize the shutter button while using your thumb to accurately adjust and hold where the focus should remain. This works especially well for moving subjects.
Read more on setting your back-button focus, and why it’s a necessity for every photographer, here.

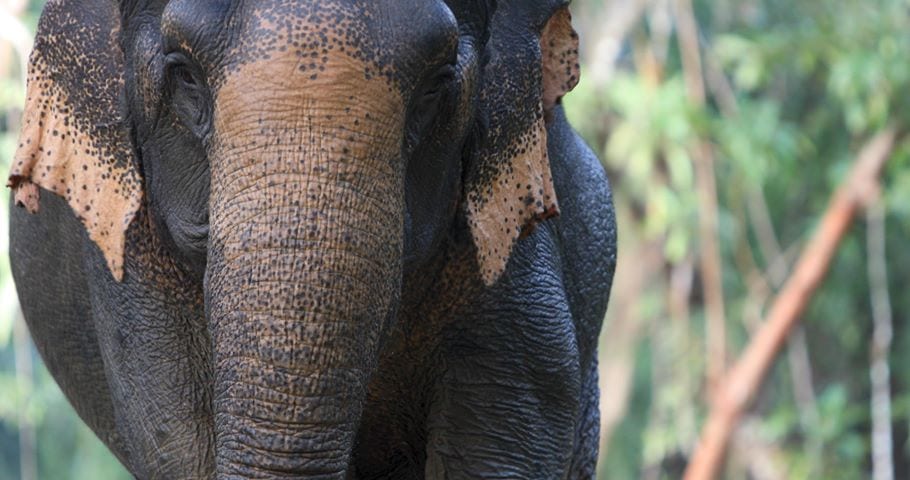
Understanding the dynamics of lighting, animal angle and speed, and background composition, and how all of those play together, will allow you to take great photos. Photo by Nathan Rolls
2) Understand your subject – The Wildlife Photography Tip that will boost your photo potential
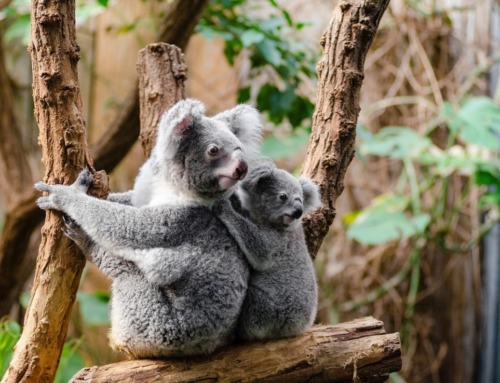
Part of being a wildlife photographer requires you to also become a naturalist. This means better understanding your subjects, their behavior, and the environment in which they live.
By researching ahead of time the wildlife you would like to photograph, you can optimize the time you spend in the field.
Knowing where animals will be at certain times of the year or day, for example, can enhance your photography opportunities.
Becoming a Naturalist
Knowing more about the behavior, and trends in behavior, of wildlife, can allow you to understand the most optimal times to see and photograph them. Most animals have seasonal and daily behaviors. These behaviors affect whether you even see them, much less whether they will be active and visible.
For example, salmon run times vary year-to-year, and the abundance of bears can be affected by these annual runs. More fish means bears are more spread out because resources are more available. Less fish means bears will be congregated closer together to compete for those limited resources.
Birds are another great example. They are often more active in the morning and evening, so spotting them is typically best during these times of the day. Their activity might include mating and foraging behavior. Or, when birds in large colonies flock together to roost for the evening.
Birds also have distinct cues they exhibit just before they fly. Look for a slight rearing back of the head and body, or defecation, which typically happens just before flight.
As you watch your subjects, you’ll more intimately know their mannerisms and behaviors. Doing some research ahead of time can go a long way in saving you time looking for them or even missing that big moment.

A flock of Red-winged Blackbirds overwinters with thousands of other birds in Bosque del Apache National Wildlife Refuge. Knowing where to look to spot such a phenomenon is important for optimizing your time in the field! Photo by Nathan Rolls
3) Create unique vantage points and change your perspective
One overlying rule in photography is “getting low,” or getting on the subject’s level, to simulate being in their environment.
Getting low works in wildlife photography for a number of reasons. You can make yourself more scarce and less threatening to wildlife if you’re lower to the ground! This enhances your photographic opportunities because wildlife may be less inclined to bolt at your presence.
The beauty of wildlife photography is having the photo viewer be brought into the landscape and the moment. If you’re shooting down at an animal on the ground, it is going to look just like that – someone looking down at a creature and taking a photo. If you’re on their level, the image transforms into something fluid with that animal and the environment they are in. It also centers on the subject of the photo solely on that animal.
Read about the top places to see wildlife in Washington State here!

On eye-level with the subject, looking through brush and greenery, this bobcat photo conveys the sense that onlookers are hidden from the animal’s sight. It allows full immersion into the environment and what the bobcat is experiencing. Photo by Nathan Rolls
We love adding some extra dimension and context to our wildlife photos and videos with our drone! Our favorite drone for lightweight travel is the DJI Mavic Air. Just remember to use ethical practices using drones around wildlife!

4) Always make the safety of wildlife your top priority – our #1 Wildlife Photography Tip!
For anyone in nature, whether a photographer, hiker, and/or bird watcher, it’s important to always respect the animals living there.
As soon as animals change their behavior in obvious association with your presence, you’re getting too close. Keep your distance from wildlife, for your safety and theirs. Be especially conscientious of sensitive habitats and wildlife (e.g., breeding birds, endangered wildlife, etc.).
Look at it this way: Animals are constantly making choices based on how to best use their energy. If they are using that energy to defend their territory against you, they are *not* using that energy to enhance their fat stores for their long winter or migration south or to defend against actual predators or territorial males attempting to usurp their territory. Examples of this are playing a bird call one too many times or getting to close to an animal.
It’s especially important to exercise more restraint and caution around wildlife with other photographers and wildlife/bird watchers present. Set a good example for others, and give everyone the opportunity to experience what you’re seeing. This is one wildlife photography tip we don’t compromise on.
The great wildlife photographers of the world have consistently used one technique to get those award-winning photos….

Mountain goats are common in many of Washington State’s higher alpine environments. Though they tend to keep to themselves, they can become territorial and aggressive, even deadly, if harassed. Photo by Nathan Rolls
5) Be patient
Yes, patience.
It’s tempting to constantly want to move around in search of the best vantage point but consider this. Animals tend to get a little jumpy and act out of their normal behavior when humans are around (this isn’t the case everywhere, but largely so). Part of this is instinctual, as we are effectually predators, and part of this is from experience, having been harassed by people before.
If you sit somewhere, quietly, in one spot, relatively hidden from your subjects, and show that you are not a threat, the animal world around you will begin to come alive. They will relax and adjust to your presence. If pop up every five minutes to adjust your location, you’ll scare the animals again and likely not get any shot, much less the one you’re hoping for.
Sure, photography can have a lot of luck involved, but work to make your own luck as well.
Allow yourself to blend into the environment in this sense, and allow nature to do its thing. The photos that result are often those that stick with you for a long time.
You’ll be comfortable being more patient if you position yourself properly. To get that shot you’re looking for, you should…

Atlantic Puffins zip in and out of their burrows quickly to avoid having other birds steal their fish. Nathan captured this photo by lying on a dirt pathway, with burrows nearby, waiting for a Puffin to drop down from the sky. It took a while, staying still in one place, but this stunning photo is the result! Photo by Nathan Rolls
Puffins are beloved by many, including us. Read our post on seeing puffins and other seabirds at Skomer Island, Wales.
6) Plan out your shots
Generally, before we go on a wildlife trip, we discuss ahead of time what and how we want to photograph. Of course, inspiration often comes in the field. However, you’ll avoid disappointment if you consider what and how you want to shoot once you’re outside.
This is also important when deciding the proper gear to bring, for example, the necessary lenses.
There are three components to consider when planning your shots in the field: use negative space to your advantage, create simple and more neutral backgrounds for portrait shots, and consider contrasting colors in the landscape to enhance your subject.
Use Negative Space to your Advantage
Compositionally, negative space can enhance a photograph, especially those with wildlife. Negative space is the space surrounding your subject, composed in such a way to highlight the subject.
Negative space can be empty space, such as open or blurred surroundings, or it can be any background composed to keep the eyes drawn toward the subject.
When photographing a bird in flight, for example, consider zooming your frame out to add directionality to the photo. If an animal is looking in a certain direction, maintain some negative space in the direction of its gaze. This allows a visually pleasing progression in the photo’s story. Shooting wider can tell a story about the animal and its relationship to the environment around it.
Create Simple and Neutral Backgrounds
Arrange your shots so that you take advantage of simple backgrounds and neutral colors. Background simplicity allows your subject to really stand out in the photo.
Sometimes changing your shooting angle can help. Also, decrease your depth of field to blur the subject’s surroundings and allow the eyes to hone in on the subject itself instead of everything else around it.
Use Contrasting Colors to Enhance the Subject
As with creating simple backgrounds, utilizing the colors in the landscape can make the animal the image focus. Contrasting colors, especially, can make a subject pop out of the image.
If there are lots of details and similar or brighter colors around the subject, your eyes won’t know where to look. As you are looking through your viewfinder, move the view around a bit. Zoom in and out, if you’re able, to find that color balance.
Getting on a different plane and at a different vantage point can provide contrasting colors to the subject. Take the sky, a nearby green bush, or golden grass illuminated in the sun to set as your background.

This Golden-mantled Ground Squirrel had been running up and down a piece of wood for about an hour. Knowing its perching location, Nathan knew the ideal angle to optimize the lighting and create a neutral background to make the Ground Squirrel the main focus. Photo by Nathan Rolls
7) Have the right gear for what you’re doing and where you’re going
Contrary to popular belief, you don’t have to have the biggest lens on the block to take great photos.
In general, having good, high-quality glass will get you far, especially once you’ve mastered using your equipment.
Canon and Nikon dominate the lenses for wildlife photography as they are well-made and their quality is largely unmatched. However, quality tends to mean the price tag can be a little high.
To combat this initially, it’s possible to get a good lens in the 100-400mm range and add a 1.4x or 2x teleconverter. This doesn’t lose too much quality and increases the focal length by 80-100mm.
If you plan on photographing birds, longer lenses, such as the 400mm to 600mm lenses, will end up being a go-to in many instances.
Our Go-To Gear Suggestions
What about all the other gear you need?
If you’re working with a big telephoto lens, invest in a solid tripod to ensure your images out of sharp and clear.
Invest also in a good cleaning kit, with a microfiber towel, soft brush, and proper cleaning solution.
It’s important to have gear that will make your life more comfortable in the field. Take whatever is appropriate for the locale you’re shooting in. For example:
Rain: Don your full rain pants, rain coat, and rain boots and get ready to get wet. Invest in a good rain cover for your camera gear.
Hot and muggy: Cover up your skin with lightweight clothing, and bring sunscreen, a solid hat, and bug spray (or even a bug net). Consider getting Silica beads to place in your camera bag to minimize moisture buildup in muggy weather.
Cold: Bring a hot thermos of tea or coffee (or cider with schnapps), hand warmers, and good fingerless photography gloves. Have extra camera batteries handy as batteries drain faster in colder weather.
People who invariably love nature and being in it don’t have to suffer through the worst of it to get photos. You’ll enjoy your craft much more if you’re well-prepared ahead of time. In our opinion, this is one of the wildlife photography tips you don’t want to skimp on.

Rainy, misty, and windy weather is common in the Faroe Islands. We made sure to have warm layers and proper rain gear for our full days spent outside! Photo by Christa Rolls
8) Don’t be afraid to get dirty
Remember that point about “getting low”? To do that, sometimes you’re going to have to get a little dirty (or wet or sandy).
Allowing yourself the opportunity to get on your knees or prone on the ground to blend into the environment, or to get the right vantage point, can enhance your photographic opportunities. This is also where having the right gear comes into play. You’ll feel more comfortable immersing yourself in the environment to get that awesome shot if you have the proper gear to keep you comfortable.
Of course, don’t put yourself at risk and be sure to abide by the laws and rules where you’re photographing.
While learning to be unafraid of *you* getting dirty, learn to avoid “babying” your gear.
Sure, you don’t want to drop your camera or lenses into a pile of sand or straight into a body of water (unless you have a protective case), but your equipment is more resilient than you might think.
Companies have continued refining this resiliency for the purpose of ensuring their user base can *get outside* and actually use the gear for its intended purpose. A little rain or mud won’t hurt. Just invest in that cleaning kit. And have a good regiment following your field time to maintain upkeep on your equipment.
Want inspiration for your next travel destination? See the best places to watch wildlife here.
9) Use lighting to your advantage and learn to “understand” light
Lighting is everything in photos – ultimately, it can make or break a great shot.
In general, the best times of day to take photos of wildlife are on cloudy days, when the sun’s rays are filtered by the clouds, and in the morning and evening.
One of the most visually pleasing times to take photos is the “golden hour” of sunlight. This is just after sunrise and before sunset when everything turns a soft, golden hue.
When the sun is high in the sky, it can effectually blow out the details of your subject. However, in the right circumstances and when using light in the right way, you can use shade to your advantage. You don’t have to avoid photographing throughout the day, but look for opportunities to tone the bright light down a bit.
Our two light-based wildlife photography tips are…
Use open shade
Open shade, whereby the subject is in a shaded location facing towards the sun, can create beautiful photos. Watch whether any part of your subject is reaching outside of the shade line or if there is “dabbled” light filtering through the shading object. Trees, for example, might throw off the light balance in your photo.
Shooting wildlife in this way can be hard, as we can’t control and place where wildlife choose to settle. If the opportunity presents itself then work the shade to your photographic advantage!
Position yourself between the subject and light source
When taking photos of wildlife, position yourself between the subject and the sun (or light source). This allows the light to fall on the subject where you intend to photograph and helps to avoid distracting shadows.
Note that if you’re in the Northern Hemisphere, standing south of your subject will give you the best vantage point light-wise for taking photos. This is because the sun will be slightly skewed toward the south (unless you are near the equator, where the sun will be directly overhead). The reverse is true for the Southern Hemisphere.

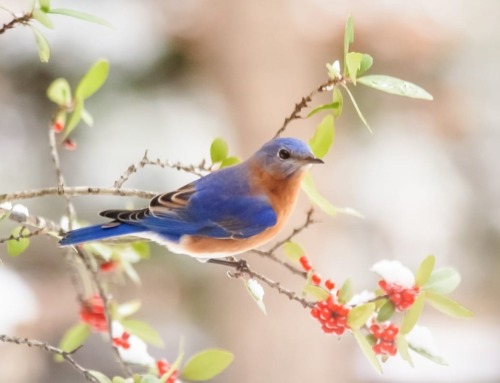
A Northern Flicker opens its wings mid-flight while the “golden hour” of sunlight further illuminates the orange-red color of the bird. Note how the light source, angled low and directly on the front of the subject, is behind the photographer. Photo by Nathan Rolls
An exception to this tip is using the time before sunrise and just after sunset to create fun and unique photo opportunities.
This is a great time to get silhouetted figures in your shots, by shooting into the light source, with the animal between you and the source of light. While this isn’t the tactic you would use during the day to get beautifully detailed photos of your subject, this method can allow you to photograph the sunrise/sunset and the silhouette of the subject.

Shooting into the direction of the setting sun, with the Greater Flamingos in flight between Nathan and the sun, silhouetted figures emerge to create a visually different perspective than shooting the subjects head-on. Photo by Nathan Rolls
Interested in photographing flamingos? One of the best places in the world to see them is in the Camargue, France!
10) Be in the moment!
It’s easy to get wrapped up in trying to get that perfect shot. You’re angling yourself just right and getting your settings spot on, etc. etc. etc.
Don’t forget to allow yourself to be in the moment with your subject.
As you hone your skill, you’ll be less inclined to take 10,000 photos (otherwise called “spray and pray”) of the same thing. Instead, you’ll wait, fingers at the ready, watching your subject and taking in their every move and moment. Soon, the one you’re looking for comes along, whether that’s a turn of the head, an interaction with another animal, catching of prey, and more.
There are few things as magical as the silence and stillness that comes with watching and photographing wildlife… taking in all they are and everything they’re doing, awaiting the shot envisioned in our minds. That feeling will come across in your work, too.

The island of Mykines in the Faroe Islands has thousands of sea birds nesting on rocky cliffs. Here, they were floating in and out of the fog in the most other-worldly way. Photo by Christa Rolls
These wildlife photography tips have given Nathan the chance to excel at wildlife photography. Are there any wildlife photography tips you would add to this list? Let us know in the comments!
Happy Photographing!
Nathan and Christa


Nice and informative article for amateur photographer like me.
Hi there, so glad the article was informative for you!